
Car CV Axle Diagnostics & Replacement in Daytona Beach, FL
CV axles transfer engine and transmission torque to the drive wheels while allowing the suspension and steering to move. Each axle uses constant-velocity joints that must operate smoothly through changes in angle, suspension travel, and wheel position.
When a CV axle, CV joint, boot, spline, or internal joint begins to fail, the vehicle may click while turning, vibrate during acceleration, clunk when shifting between acceleration and deceleration, leak grease, or develop excessive play in the driveline.
Jimmy’s Mobile Care provides car CV axle diagnostics and replacement in Daytona Beach, FL. We inspect the axle assembly and related driveline components before recommending replacement so a wheel bearing, tire, engine mount, transmission problem, ball joint, or other suspension fault is not mistaken for a bad CV axle.
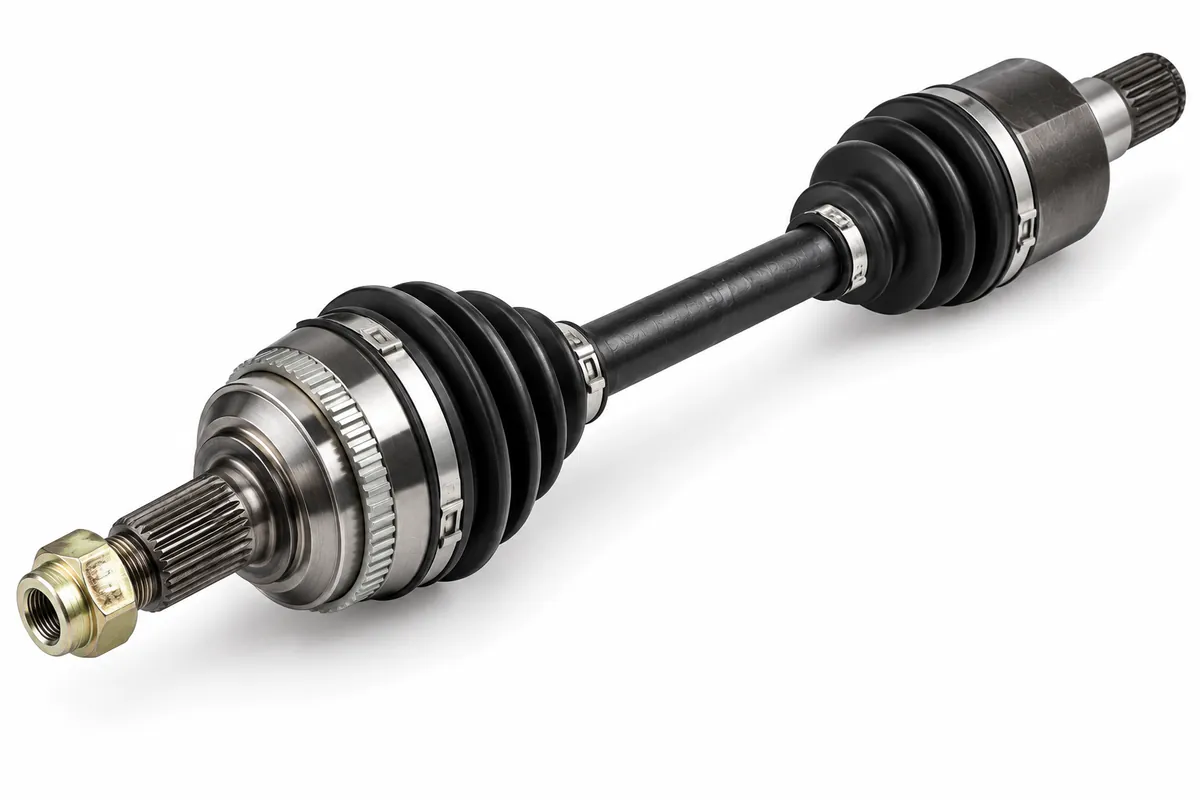
Mobile CV Axle Diagnostics in Daytona Beach
A clicking or vibrating vehicle does not automatically need a CV axle.
Depending on the vehicle and symptoms, CV axle diagnosis can include checking:
- Outer CV joint
- Inner CV joint
- CV boots
- Boot clamps
- Axle shaft
- Inner and outer splines
- Axle nut
- Transmission or differential engagement
- Inner joint plunge movement
- Excessive joint play
- Grease leakage
- Torn boots
- Binding
- Clicking during turns
- Vibration during acceleration
- Clunking during load changes
- Wheel-bearing play
- Engine and transmission mounts
- Tires and wheels
- Related suspension components
The goal is to determine whether the axle itself is responsible for the complaint and, when possible, which portion of the axle assembly is failing.
What Is a CV Axle?
A CV axle is a driven axle shaft that connects the transmission or differential to a drive wheel.
“CV” stands for constant velocity.
The joints at either end are designed to transfer rotational power even when the axle changes angle.
A typical front-wheel-drive CV axle includes:
- Outer CV joint
- Inner CV joint
- Axle shaft
- Inner CV boot
- Outer CV boot
- Boot clamps
- Splined ends
Many all-wheel-drive and four-wheel-drive vehicles also use CV axles.
CV Axle vs. CV Joint
The terms are related but not identical.
CV Axle
The complete half-shaft assembly running between the drivetrain and wheel hub.
CV Joint
The articulated joint at one end of the axle.
Most replacement CV axles are sold as complete assemblies containing:
- Shaft
- Inner joint
- Outer joint
- Boots
- Grease
That is why a worn CV joint often results in replacement of the complete axle assembly rather than rebuilding only the joint.
CV Axle vs. Half Shaft
“CV axle” and “half shaft” are often used to describe the same basic component.
The term half shaft refers to the axle shaft connecting one side of a differential or transaxle to a wheel.
On many passenger vehicles, that half shaft uses CV joints and is therefore commonly called a CV axle.
Front-Wheel-Drive CV Axles
Front-wheel-drive vehicles commonly use two front CV axles:
- Driver-side axle
- Passenger-side axle
Each axle connects the transaxle to a front wheel.
Because the front wheels also steer and move with the suspension, the outer CV joints must operate through changing angles.
All-Wheel-Drive CV Axles
All-wheel-drive vehicles may use CV axles at:
- Front wheels
- Rear wheels
- Both
The design varies considerably.
A vehicle may therefore have:
- Two CV axles
- Four CV axles
depending on the drivetrain.
Four-Wheel-Drive CV Axles
Many independent-front-suspension trucks and SUVs use front CV axles even though they are described as four-wheel-drive vehicles.
These axles connect the front differential to the front wheel hubs.
Possible failure symptoms are similar to passenger-car CV axles, although lifted suspensions and off-road use can increase joint angles and loads.
Outer CV Joint
The outer CV joint is located near the wheel hub.
Its job is to transfer torque while allowing a large steering angle.
Outer joints commonly experience:
- Steering-angle movement
- Suspension movement
- High torque
A worn outer joint is particularly associated with clicking or popping while turning.
Inner CV Joint
The inner CV joint connects the axle to the transmission or differential.
It usually allows the axle to change length slightly as the suspension moves.
This is often called plunge movement.
Inner-joint problems are more commonly associated with:
- Vibration under acceleration
- Shudder under load
- Clunking during throttle changes
- Excessive driveline movement
Inner and outer CV joints can therefore produce different symptoms.
Tripod-Style Inner CV Joint
Many vehicles use a tripod-style inner CV joint.
The joint may contain:
- Three rollers
- Internal tracks
- Grease
- Plunging mechanism
Wear in the tracks or rollers can produce vibration that is most noticeable during acceleration.
Rzeppa-Style CV Joint
A common outer CV joint design uses:
- Ball bearings
- Inner race
- Outer housing
- Cage
This design allows large operating angles while maintaining nearly constant rotational velocity.
Wear in the ball tracks can produce the characteristic clicking associated with turning.
Signs of a Bad CV Axle
Possible symptoms include:
- Clicking while turning
- Popping while turning
- Clunking during acceleration or deceleration
- Vibration under acceleration
- Shudder under load
- Grease around inside of wheel
- Torn CV boot
- Excessive joint play
- Binding during rotation
- Damaged axle shaft
- Noise during tight turns
Not every one of these symptoms proves the axle is bad.
Diagnosis should distinguish the CV axle from other drivetrain and suspension components.
Clicking When Turning
Repeated clicking during a tight turn is one of the classic symptoms of outer CV-joint wear.
The noise may become more noticeable during:
- Parking-lot turns
- U-turns
- Full-lock steering
- Acceleration while turning
A worn outer joint can make a rhythmic clicking sound that follows wheel speed.
The axle should still be inspected before replacement because other components can also make noise during steering.
Does Clicking Mean the Left or Right CV Axle Is Bad?
The side producing the noise is not always obvious from the driver’s seat.
Noise can travel through the chassis.
Diagnosis may involve:
- Reproducing the clicking
- Inspecting both outer joints
- Checking boots
- Comparing joint play
- Observing which steering direction produces the strongest symptom
The noisy side should be identified before ordering the axle.
Clicking Only on Full-Lock Turns
A badly worn outer CV joint may click most noticeably when the steering wheel is near full lock because the joint is operating at a larger angle.
Some tire scrub or steering noise can also occur during very tight turns.
The noise pattern and joint condition should be evaluated together.
Popping When Turning
A popping sound during steering can be caused by:
- Outer CV joint
- Strut bearing
- Ball joint
- Steering component
- Suspension bushing
A CV-joint pop is more convincing when it repeats rhythmically as the wheel rotates under power.
A single pop is less specific.
Vibration During Acceleration
An inner CV joint can cause vibration or shudder when torque is applied.
The vibration may:
- Increase during acceleration
- Decrease when throttle is released
- Be more noticeable at certain speeds
This differs from many tire or wheel vibrations, which are usually more closely related to vehicle speed than engine load.
CV Axle Vibration at Highway Speed
A CV axle can contribute to highway vibration, especially if:
- Shaft is bent
- Inner joint is worn
- Replacement axle is poorly balanced
- Joint has excessive play
However, highway vibration is also commonly caused by:
- Tire imbalance
- Bent wheel
- Tire defect
- Wheel bearing
The conditions under which the vibration occurs are important.
Vibration Only Under Load
A vibration that becomes noticeable primarily when accelerating can point more strongly toward:
- Inner CV joint
- Engine or transmission mount
- Driveline issue
If the vibration disappears immediately when the throttle is released while vehicle speed remains the same, load-sensitive driveline components deserve attention.
CV Axle Shudder
An inner CV joint can sometimes produce a shudder that feels through:
- Floor
- Seat
- Steering wheel
The shudder may be strongest during:
- Moderate acceleration
- Uphill driving
- Low-speed load
The symptom should be distinguished from engine misfire and transmission shudder.
CV Axle Clunk
A worn axle or CV joint may clunk when torque direction changes.
Examples include:
- Shifting into Drive
- Shifting into Reverse
- Accelerating after coasting
- Releasing and reapplying throttle
However, clunking can also result from:
- Engine mount
- Transmission mount
- Differential play
- Suspension bushing
The source should be inspected before replacing the axle.
CV Axle Noise While Driving Straight
Outer CV joints are best known for turning noise, but an axle can also make noise while traveling straight if wear is severe.
Possible causes include:
- Inner joint wear
- Damaged bearing surfaces
- Bent axle
- Severely deteriorated outer joint
Noise while driving straight is less specific and requires careful diagnosis.
Torn CV Boot
CV joints are packed with grease and protected by flexible rubber or thermoplastic boots.
A torn boot can allow:
- Grease to escape
- Dirt to enter
- Water to enter
Contamination accelerates joint wear.
A torn boot should be addressed before the joint is damaged if possible.
Cracked CV Boot
A boot can begin developing small cracks before it tears completely.
Cracks may appear around:
- Bellows
- Clamp area
- Folds
A cracked boot that has not yet leaked may still provide an opportunity for preventive repair depending on the axle design and joint condition.
CV Boot Grease Leak
Grease may be thrown outward by axle rotation.
Common places to find CV grease include:
- Inner wheel
- Suspension arm
- Strut
- Wheel well
- Underside of vehicle
The source should be confirmed because other automotive fluids can sometimes collect in the same area.
Grease Around the Inside of the Wheel
Grease sprayed in a circular pattern around the inside of a front wheel is a strong clue that the outer CV boot may have split.
The axle should be inspected for:
- Boot tear
- Loose clamp
- Joint contamination
- Clicking
A damaged boot does not automatically prove that the joint has already failed.
CV Boot Clamp Failure
A boot can leak even if the rubber itself is intact.
Possible causes include:
- Loose clamp
- Broken clamp
- Incorrect installation
- Boot pulled away from joint housing
If contamination has not occurred and the joint remains healthy, repairing the boot may be possible.
CV Boot Replacement vs. CV Axle Replacement
A boot-only repair may be reasonable when:
- Tear is caught early
- Joint is not clicking
- Joint has no excessive play
- Contamination is minimal
- Axle itself is in good condition
Complete axle replacement may make more sense when:
- Joint is already noisy
- Dirt or water entered joint
- Grease has been lost for an extended period
- Joint has excessive wear
- Complete axle cost is practical
The joint condition should determine the repair.
Can You Drive With a Torn CV Boot?
A torn boot does not always cause immediate axle failure.
However, continued driving allows grease to leave and contaminants to enter.
This can turn a repairable boot issue into a worn CV joint requiring complete axle replacement.
Early inspection is advisable.
Can You Drive With a Clicking CV Joint?
A clicking joint is already showing signs of wear.
The amount of remaining service life cannot be predicted accurately from the sound alone.
As wear progresses, the joint can become:
- Louder
- Looser
- Less reliable
Replacement should not be indefinitely postponed once joint failure is confirmed.
Can a CV Axle Break?
Yes.
Severe wear or physical damage can cause an axle or CV joint to fail.
If the axle can no longer transfer torque, the vehicle may lose drive to the affected wheel.
Depending on differential design, the vehicle may no longer move under its own power.
Broken CV Axle Symptoms
Possible symptoms include:
- Vehicle will not move
- Engine revs but vehicle remains stationary
- Loud clunk
- Axle visibly disconnected
- Severe vibration before failure
Similar symptoms can occur from transmission or differential problems, so diagnosis is still necessary.
CV Axle Play
CV joints require some engineered movement to operate.
Not every amount of movement means the axle is bad.
Possible normal movements can include:
- Plunge at inner joint
- Limited rotational clearance
Excessive looseness, roughness, or movement outside normal joint behavior can indicate wear.
Comparison with specifications or the opposite side can help.
Rotational Play in a CV Axle
A small amount of rotational movement may exist because of clearances throughout:
- CV joint
- Differential
- Transmission
A large clunking movement should be traced carefully because drivetrain backlash can make the axle appear looser than it actually is.
Axial Movement in an Inner CV Joint
Inner joints are commonly designed to move in and out as the suspension travels.
This axial movement is called plunge.
It is therefore incorrect to condemn an inner joint simply because it slides in and out within its designed range.
The movement should be evaluated for:
- Smoothness
- Excessive looseness
- Binding
CV Joint Binding
A joint that binds rather than articulating smoothly can create:
- Vibration
- Jerking
- Steering-related noise
Possible causes include:
- Internal wear
- Contamination
- Physical damage
- Incorrect axle length
Binding should be distinguished from resistance caused by other drivetrain components.
Bent CV Axle
An axle shaft can bend because of:
- Collision
- Severe pothole impact
- Off-road damage
- Improper handling
A bent shaft can cause rotational vibration.
Because the shaft turns with vehicle speed, the vibration may increase as speed increases.
A visibly bent axle generally requires replacement.
CV Axle and Wheel Bearing
CV axles and wheel bearings are closely located but perform different jobs.
CV Axle
Transfers torque to the wheel.
Wheel Bearing
Supports wheel rotation and vehicle load.
A bad wheel bearing more commonly produces:
- Humming
- Growling
- Roaring
- Noise that changes with cornering load
A bad CV joint more commonly produces:
- Clicking during turns
- Vibration under torque
The symptoms can overlap, so both should be checked.
CV Axle and Ball Joint
A ball joint allows suspension and steering movement.
A worn ball joint can cause:
- Clunking
- Steering looseness
- Tire wear
It does not normally produce the repetitive turning click associated with an outer CV joint.
Ball-joint condition should still be inspected when the axle must be removed from the hub area.
CV Axle and Tie Rod
A tie rod connects the steering rack or steering linkage to the steering knuckle.
A worn tie rod can cause:
- Steering play
- Wandering
- Tire wear
- Clunking
It does not transmit engine torque.
A steering complaint should not automatically be blamed on the CV axle.
CV Axle and Engine Mounts
A damaged engine or transmission mount can cause:
- Vibration under acceleration
- Clunk during load changes
- Excessive drivetrain movement
Those symptoms can imitate an inner CV-joint problem.
Mount condition should be considered when diagnosing acceleration vibration.
CV Axle and Transmission Problems
A transmission fault can also create:
- Shudder
- Clunk
- Vibration
- Delayed engagement
The relationship between the symptom and:
- Vehicle speed
- Engine load
- Gear changes
can help distinguish transmission behavior from an axle problem.
CV Axle and Tire Vibration
Tire and wheel problems commonly cause vibration.
Possible causes include:
- Wheel imbalance
- Bent rim
- Tire separation
- Out-of-round tire
A tire-related vibration usually tracks vehicle speed consistently.
An inner CV-joint vibration often changes more noticeably with acceleration load.
CV Axle and Brake Noise
Brake components can make:
- Clicking
- Scraping
- Grinding
A loose brake pad or caliper hardware problem can sometimes imitate drivetrain noise.
The noise should be reproduced and located before axle replacement.
CV Axle and Differential
The inner end of a CV axle usually engages:
- Transaxle differential
- Front differential
- Rear differential
Depending on design, the axle may be retained by:
- Snap ring
- Circlip
- Bolted flange
- Intermediate shaft connection
The differential connection should be inspected during axle removal and installation.
CV Axle Splines
Splines transfer torque between the axle and mating components.
Splines may be found at:
- Wheel hub
- Transmission/differential
- Intermediate shaft
Damaged splines can cause:
- Loose fit
- Incomplete engagement
- Loss of drive
Splines should be cleaned and inspected during replacement.
Stripped CV Axle Splines
Severely damaged splines can prevent proper torque transfer.
Possible causes include:
- Loose axle nut
- Incorrect installation
- Corrosion
- Impact damage
- Excessive wear
If the wheel-hub splines are also damaged, replacing the axle alone may not be enough.
CV Axle Nut
The outer axle spline is commonly secured to the wheel hub with a large axle nut.
This fastener may affect:
- Axle retention
- Wheel-bearing preload depending on design
Correct torque is critical.
An axle nut should not simply be tightened by feel.
Loose Axle Nut
A loose axle nut can cause:
- Clicking
- Movement
- Wheel-bearing damage
- Hub spline wear
If looseness is found, both the axle and hub/bearing should be inspected before simply retightening the nut.
Axle Nut Torque
Axle-nut torque specifications vary greatly by vehicle.
Some designs also require:
- New nut
- Staking
- Cotter pin
- Torque-angle procedure
Correct vehicle-specific procedure should be followed because improper torque can damage the wheel bearing or allow the axle to loosen.
Staked Axle Nut
Some axle nuts are mechanically staked into a groove after tightening.
The old stake must be released before removal.
After installation, a new nut may need to be properly torqued and restaked.
A previously staked nut may not be intended for unlimited reuse.
CV Axle Retaining Clip
Many inner axle splines use a retaining ring or circlip.
The clip helps hold the axle inside the transaxle or differential.
During installation, the axle must seat completely so the retaining mechanism engages.
An axle that is not fully seated can:
- Leak fluid
- Pull out
- Lose drive
CV Axle Not Fully Seated
Signs that an inner axle may not be seated correctly can include:
- Visible gap
- Fluid leak
- Axle movement
- Failure to retain
- Abnormal noise
The exact seating depth varies by vehicle.
Installation should be verified before the vehicle is driven.
Intermediate Shaft
Some vehicles use an intermediate shaft between the transmission and one CV axle.
The design can help equalize axle lengths.
The intermediate shaft may use:
- Support bearing
- Carrier bracket
- Splined connection
Wear in the intermediate shaft or support bearing can imitate an inner CV-axle problem.
CV Axle Support Bearing
Certain longer axle systems use a support or carrier bearing.
A worn bearing can cause:
- Vibration
- Noise
- Play
This should be evaluated separately from the CV joints.
Some replacement configurations include the bearing as part of a larger assembly.
Transmission Seal at CV Axle
Where the axle enters the transmission or differential, an oil seal helps contain fluid.
The seal may be disturbed during axle replacement.
It should be inspected for:
- Leakage
- Damage
- Hardened sealing lip
A leaking seal may need replacement separately from the axle.
Transmission Fluid Leak After CV Axle Replacement
A fluid leak after axle replacement can result from:
- Damaged axle seal
- Seal lip folded during installation
- Axle not fully seated
- Incorrect axle surface
- Excessive seal wear
A leak should be corrected promptly because low transmission or differential fluid can cause drivetrain damage.
CV Axle Seal Surface
Some axle shafts have a machined surface where the transmission seal rides.
Damage such as:
- Corrosion
- Grooves
- Scratches
can prevent the new or existing seal from containing fluid properly.
The sealing area should be inspected before installation.
Transmission Fluid Loss During Axle Replacement
Depending on the drivetrain design and vehicle angle, some transmission or differential fluid may escape when the axle is removed.
The fluid level should be checked according to the vehicle-specific procedure after the repair.
Not all transmissions use the same fluid-level checking method.
CV Axle Replacement
Once diagnostics confirm that the CV axle or joint is worn or damaged, replacement can generally involve:
- Confirm the affected axle. We identify whether the problem is on the driver or passenger side and whether the inner or outer joint is responsible.
- Inspect the CV boots. Torn boots, lost grease, and contamination help establish joint condition.
- Inspect related components. Wheel bearing, ball joint, mounts, tires, and suspension are checked as appropriate.
- Verify the correct replacement axle. Axle length, spline count, ABS features, and drivetrain configuration must match.
- Safely raise and support the vehicle.
- Remove the wheel.
- Release the axle nut according to vehicle procedure.
- Disconnect the necessary suspension components to allow the outer axle spline to leave the hub.
- Support the steering knuckle to avoid damaging the brake hose or ABS wiring.
- Remove the outer axle spline from the hub.
- Release the inner joint from the transmission, differential, or intermediate shaft.
- Remove the complete axle assembly.
- Inspect the hub splines.
- Inspect the transmission or differential seal.
- Compare the replacement axle with the original.
- Verify overall length and spline configuration.
- Install the inner axle connection.
- Confirm the retaining clip or flange is fully engaged.
- Install the outer splines into the hub.
- Reconnect the suspension components.
- Install the axle nut.
- Torque axle and suspension fasteners to proper specifications.
- Stake or secure the axle nut if required.
- Check transmission or differential fluid as appropriate.
- Reinstall the wheel.
- Lower the vehicle.
- Verify there are no fluid leaks.
- Road-test the vehicle when appropriate.
- Confirm that the original clicking, clunking, or vibration has been corrected.
The exact procedure varies significantly between vehicles.
Driver-Side CV Axle Replacement
A driver-side axle is often shorter on a transverse front-wheel-drive vehicle because the transmission differential may be positioned closer to that wheel.
Replacement can involve direct engagement with the transaxle.
Vehicle-specific design determines:
- Retaining clip type
- Axle length
- Seal arrangement
A driver-side axle should not be assumed interchangeable with the passenger side.
Passenger-Side CV Axle Replacement
Passenger-side axles may be longer.
Some vehicles use:
- Long one-piece axle
- Intermediate shaft plus shorter CV axle
- Support bearing
Correct identification is important because multiple axle configurations may exist for the same model depending on drivetrain and engine.
Left CV Axle vs. Right CV Axle
Left and right axles can differ in:
- Length
- Splines
- Joint design
- ABS features
- Intermediate-shaft connection
The replacement should be selected for the correct side.
Front CV Axle Replacement
Front CV axle replacement generally requires separating enough of the front suspension to remove the outer axle spline from the hub.
The exact method may involve disconnecting:
- Lower ball joint
- Control arm
- Steering knuckle connection
depending on design.
The objective is to create enough movement without damaging surrounding components.
Rear CV Axle Replacement
All-wheel-drive and independent-rear-suspension vehicles may use rear CV axles.
The inner connection may be:
- Splined into differential
- Bolted to a flange
Rear axle service can differ substantially from front-wheel-drive axle replacement.
CV Axle Removal From Wheel Hub
The outer axle spline may slide easily from the hub or may be seized by corrosion.
Excessive hammering can damage:
- Axle threads
- Wheel bearing
- Hub
Appropriate removal methods should be used when the spline is stuck.
Seized CV Axle in Hub
Corrosion can lock the axle spline into the hub.
This may require:
- Penetrating treatment
- Proper press or puller
- Specialized axle-removal tools
If the hub or bearing is damaged during removal, additional repair may be required.
CV Axle Removal From Transmission
Many inner CV joints are retained by a circlip and must be released from the differential with controlled leverage.
Care is needed to avoid damaging:
- Transmission case
- Axle seal
- Differential components
The correct removal point should be used rather than prying against fragile surfaces.
CV Axle Installation Into Transmission
During installation, the inner splines must align correctly and the retaining clip must engage.
Forcing the axle can damage:
- Splines
- Seal
- Clip
Once seated, the axle should be checked to make sure it is properly retained.
CV Axle and ABS Tone Ring
Some axle designs may incorporate or work near an ABS tone ring or encoder system.
Depending on vehicle design, the wheel-speed signal may come from:
- Hub bearing
- Axle ring
- Separate tone wheel
Damage to an axle-associated tone ring can cause ABS or traction-control faults.
Not every modern axle includes the ABS encoder itself.
CV Axle Replacement and Wheel Alignment
Replacing a CV axle does not automatically require an alignment if the repair does not alter alignment settings.
However, alignment may be advisable if:
- Strut-to-knuckle bolts are disturbed
- Alignment components are loosened
- Vehicle already has uneven tire wear
- Other suspension parts are replaced
The procedure used to remove the axle matters.
CV Axle Replacement and Ball Joint
Some vehicles require the ball joint to be disconnected to create enough movement for axle removal.
The ball joint does not automatically need replacement.
However, if inspection finds:
- Excessive play
- Torn boot
- Damage
it should be addressed separately.
CV Axle Replacement and Wheel Bearing
The wheel bearing is normally reused during axle replacement if it remains in good condition.
A bearing may require replacement when:
- Excessive play exists
- It is noisy
- Hub splines are damaged
- Improper axle-nut torque has damaged it
Replacing the axle does not automatically require a new bearing.
CV Axle Replacement and Transmission Seal
An axle seal does not necessarily need replacement every time an axle is removed.
Replacement may be appropriate if:
- Existing seal leaks
- Lip is damaged
- Seal is hardened
- Axle surface has damaged it
The seal should be inspected while access is available.
CV Axle Replacement and Transmission Fluid
Some fluid may be lost during axle removal.
The correct fluid type and level should be verified after service when applicable.
Overfilling or using the wrong fluid can also create transmission problems.
Complete CV Axle vs. CV Joint Replacement
Although individual CV joints can sometimes be serviced separately, complete axle assemblies are commonly replaced because they include:
- New inner joint
- New outer joint
- New boots
- New grease
- New shaft assembly
Whether complete-axle replacement is preferable depends on:
- Parts availability
- Labor involved
- Axle quality
- Condition of remaining joint
CV Joint Replacement Only
Individual joint replacement may still be used in certain applications.
This can involve:
- Removing axle
- Disassembling joint
- Cleaning old grease
- Installing new joint
- Packing grease
- Installing new boot and clamps
The cost and availability of complete axles have made this less common on many passenger vehicles.
CV Boot Replacement
Boot replacement generally involves:
- Removing axle.
- Disassembling the appropriate joint.
- Removing old boot.
- Cleaning joint thoroughly.
- Inspecting joint surfaces.
- Packing correct grease.
- Installing new boot.
- Installing proper clamps.
- Reassembling axle.
If the joint already clicks or has contaminated wear surfaces, boot replacement alone may not provide a lasting repair.
Split CV Boots
Aftermarket split boots are designed to install without fully removing or disassembling the axle.
They can be convenient in certain situations.
However, long-term sealing and durability can depend heavily on:
- Product quality
- Installation
- Joint cleanliness
A conventional one-piece boot is generally closer to the original design.
CV Joint Grease
CV joints require specialized grease formulated for high load and articulation.
The correct amount matters.
Too little grease can accelerate wear.
Excess grease or incorrect packing can interfere with boot operation.
The grease supplied for the specific joint or boot kit should be used.
Can You Add Grease to a Clicking CV Joint?
Adding grease cannot reverse mechanical wear that has already developed in the joint tracks and bearings.
If a joint is clicking because its internal surfaces are worn, lubrication may not eliminate the underlying damage.
Diagnosis should determine whether the joint remains serviceable.
New CV Axle Clicking
A new axle should not normally produce the same turning click as the failed axle.
If clicking remains after replacement, possible causes include:
- Wrong axle
- Defective replacement axle
- Axle not fully seated
- Loose axle nut
- Wheel bearing
- Other suspension component
The original diagnosis and installation should be rechecked.
New CV Axle Vibrates
A replacement axle can sometimes introduce vibration if there is:
- Incorrect axle length
- Poor joint quality
- Bent shaft
- Inner-joint problem
- Installation issue
Engine mounts and tires should also be reconsidered if the vibration was not corrected.
Aftermarket CV Axle Vibration
Some drivetrains are particularly sensitive to axle geometry and inner-joint design.
A replacement axle that fits dimensionally may still behave differently from the original component.
If a new vibration appears immediately after axle replacement, the replacement part itself should be considered.
CV Axle Too Long or Too Short
An incorrect axle length can create serious problems.
If too long, the axle may:
- Bind
- Bottom inner joint
- Load transmission components
If too short, it may:
- Overextend
- Pull from transmission
- Damage joint
The replacement should match the original application exactly.
CV Axle Bottoming in Inner Joint
The inner joint needs enough plunge range for suspension movement.
If the axle is incorrect or drivetrain position has changed because of damaged mounts, the joint may operate too close to the end of its travel.
This can create:
- Vibration
- Binding
- Clunking
Axle length and drivetrain position should both be considered.
CV Axles on Lowered Vehicles
Lowering a vehicle changes axle operating angles.
Depending on the amount of modification, increased joint angles can contribute to:
- Boot stress
- Inner-joint wear
- Binding
Modified suspension geometry should be considered if CV axles repeatedly fail.
CV Axles on Lifted Trucks and SUVs
Suspension lifts can significantly increase CV-joint operating angles on independent-front-suspension vehicles.
Excessive angle can contribute to:
- Boot wear
- Joint wear
- Binding
- Reduced axle life
Replacement of the axle without addressing extreme operating angle may result in repeated failure.
Heavy-Duty CV Axles
Upgraded or heavy-duty axles are available for certain trucks, SUVs, off-road vehicles, and modified cars.
They may use:
- Larger shafts
- Stronger joints
- Different materials
A stronger axle does not correct improper suspension geometry or extreme joint angles.
The complete vehicle setup should be considered.
OEM vs. Aftermarket CV Axles
Replacement CV axles are available as:
- Original-equipment assemblies
- Remanufactured axles
- New aftermarket axles
- Performance axles
Important differences can include:
- Joint quality
- Shaft balance
- Boot quality
- Joint geometry
- Spline accuracy
- Fit
A low-cost axle that physically fits may not always duplicate original driveline behavior.
New vs. Remanufactured CV Axle
A remanufactured axle typically reuses some original components after:
- Inspection
- Machining or refurbishment
- Replacement of wear parts
A new axle uses newly manufactured components.
Quality can vary in both categories.
Proper application and manufacturing quality matter more than the label alone.
Should CV Axles Be Replaced in Pairs?
CV axles generally do not need to be replaced in pairs simply because one side fails.
Unlike some suspension components, left and right CV axles operate independently.
If:
- One axle is bad
- Opposite axle is quiet
- Boots are intact
- Joints are healthy
only the failed side may need replacement.
Both sides should still be inspected.
Do Both CV Axles Wear at the Same Rate?
Not necessarily.
Axle lengths, joint angles, driving conditions, boot exposure, and drivetrain layout can differ from side to side.
One axle may fail long before the other.
Condition should determine replacement.
CV Axle Life Expectancy
There is no fixed mileage at which every CV axle should be replaced.
Axles can last a very long time if:
- Boots remain intact
- Joint angles remain normal
- Grease stays clean
Premature failure can result from:
- Torn boot
- Contamination
- Lifted or lowered suspension
- Collision damage
- Poor-quality replacement parts
Inspection is more useful than a universal mileage interval.
CV Axle Replacement Cost
CV axle replacement cost depends on factors such as:
- Vehicle year, make, and model
- Front vs. rear axle
- Driver vs. passenger side
- Two-wheel drive vs. AWD/4WD
- Intermediate shaft design
- Rust or seized hub splines
- Transmission seal condition
- Suspension disassembly required
- Axle type and parts quality
A straightforward front-wheel-drive axle can be very different from an axle on an all-wheel-drive or heavily corroded vehicle.
Call Jimmy’s Mobile Care at (386) 308-2509 with your vehicle information and symptoms so we can determine the appropriate diagnostic service.
Why Diagnose a CV Axle Before Replacing It?
CV axle symptoms overlap with several other vehicle systems.
Does It Click Repeatedly During Turns?
That pattern can support outer CV-joint wear.
Does It Vibrate Mainly Under Acceleration?
An inner CV joint may be involved, but drivetrain mounts should also be checked.
Is a CV Boot Torn?
The joint may still be usable if the damage was caught early.
Has Grease Been Lost?
Long-term grease loss increases the likelihood that the joint itself is worn.
Is the Wheel Bearing Noisy?
A bearing can create wheel-speed-related noise that is mistaken for axle failure.
Is There Excessive Engine or Transmission Movement?
A failed mount can create acceleration vibration and clunking.
Are the Tires or Wheels Causing the Vibration?
A speed-related tire vibration can resemble an axle problem.
Is the Axle Actually Bent or Loose?
Physical inspection can reveal shaft or spline damage.
Testing and inspection help make sure the axle is replaced for an actual axle-related fault rather than because the symptoms merely sound similar.
Mobile CV Axle Diagnostics in Daytona Beach
Jimmy’s Mobile Care provides mobile car CV axle diagnostics in Daytona Beach for vehicles experiencing:
- Clicking while turning
- Popping during turns
- Vibration during acceleration
- Shudder under load
- Driveline clunk
- Torn CV boot
- Grease around the wheel
- Suspected inner CV-joint wear
- Suspected outer CV-joint wear
- Excessive axle play
We inspect the axle assembly and the nearby drivetrain, suspension, wheel-bearing, and mounting components needed to determine whether the CV axle is actually responsible.
Mobile CV Axle Replacement in Daytona Beach
When diagnostics confirm a worn or damaged CV axle and the repair is appropriate for mobile service, Jimmy’s Mobile Care can replace many front and rear CV axles at your Daytona Beach location.
After installation, we can verify:
- Inner axle engagement
- Outer spline fit
- Axle-nut security
- CV boot condition
- Proper suspension clearance
- No visible transmission or differential leakage
- Normal axle rotation
- Improvement of the original noise or vibration
Vehicles with severely seized hub splines, extensive corrosion, specialized AWD drivetrains, damaged wheel hubs, or significant transmission/differential problems may require additional equipment or repairs.
Schedule Car CV Axle Diagnostics & Replacement in Daytona Beach
A click, vibration, or clunk does not automatically mean the CV axle has failed.
The problem may instead involve a wheel bearing, tire, wheel, engine mount, transmission mount, suspension component, or another driveline part.
Jimmy’s Mobile Care diagnoses the axle and related components before replacement so the CV axle is replaced only when the evidence supports it.
Call Jimmy’s Mobile Care at (386) 308-2509 to schedule car CV axle diagnostics and replacement in Daytona Beach, FL. Call today and we'll come to your location.